
Oven-Baked Cheesy Tacos

A foolproof, family-friendly method for perfectly melty, oven-baked cheesy tacos — great for weeknights, parties, and picky eaters.
This oven-baked cheesy tacos recipe became our go-to on chaotic weeknights the moment I discovered how simple it is to get evenly heated, melty cheese and crisp taco shells without standing over a skillet for ages. I first tested this approach on a rainy Sunday when I wanted something that felt like a small celebration but required minimal babysitting. The result was a tray of golden, bubbling tacos that smelled like a fiesta and disappeared faster than I could set the table. My seven-year-old declared them officially "party tacos," and my partner requested them for every game night since.
What makes these tacos special is the balance of textures and flavors you get from a little technique rather than fuss: well-seasoned ground beef cooked with onion and garlic, a hint of tomato for moisture, crisp corn or flour shells that hold a generous layer of melted cheese, and bright, crunchy toppings to finish. This method scales easily, uses pantry-friendly ingredients, and is forgiving for new cooks — the oven does most of the work. Expect warm, savory bites with pockets of gooey cheese and the freshness of shredded lettuce and cilantro. They travel well to potlucks and can be prepped ahead, making them an ideal weeknight hero or crowd-pleasing appetizer.
Why You'll Love This Recipe
- Ready in about 30 minutes from start to finish: 15 minutes prep and about 15 minutes in the oven, which makes this a reliable weeknight option.
- Uses simple pantry staples — ground beef, taco seasoning, tomato sauce, and shredded cheese — which means you can pull it together quickly without a special trip to the store.
- Oven method keeps hands free and delivers evenly melted cheese with crisp shells, avoiding soggy bottoms or burnt edges from skillet finishing.
- Highly adaptable: swap the beef for turkey, chicken, or plant-based crumbles; switch cheese blends; or add beans and veggies for a lighter version.
- Make-ahead friendly: brown the meat in advance and assemble right before baking, or bake assembled tacos and reheat in the oven for busy evenings.
- Crowd-pleaser for all ages — kids love the melted cheese, adults appreciate the seasoning and topping customization.
I first served these at a family gathering and watched as three generations helped themselves to second and third tacos. The ease of assembly and the fact that everyone can top their own made it a hit. Over time I learned to double the filling for bigger groups and to keep a tray warm in the oven at 200°F (95°C) while guests arrive.
Ingredients
- 1 lb ground beef: Choose 80/20 for rich flavor and a bit of fat that keeps the filling juicy. Leaner beef works but add a splash of oil. I use locally sourced ground beef when possible; it browns evenly and develops more savory depth.
- 1 small onion, finely diced: Yellow onion is ideal for cooking, offering sweetness as it softens; dice finely so it integrates with the meat and doesn't overpower each bite.
- 2 cloves garlic, minced: Fresh garlic provides a bright aromatic lift; add toward the end of browning to avoid bitterness from burning.
- 1 packet taco seasoning (or homemade mix): A standard 1.25 ounce packet or about 2 tablespoons of homemade blend (chili powder, cumin, paprika, oregano, salt, pepper) — adjust heat to taste.
- 2/3 cup tomato sauce or salsa: Adds moisture and a subtle tang; salsa adds texture and extra flavor if you prefer it spicier.
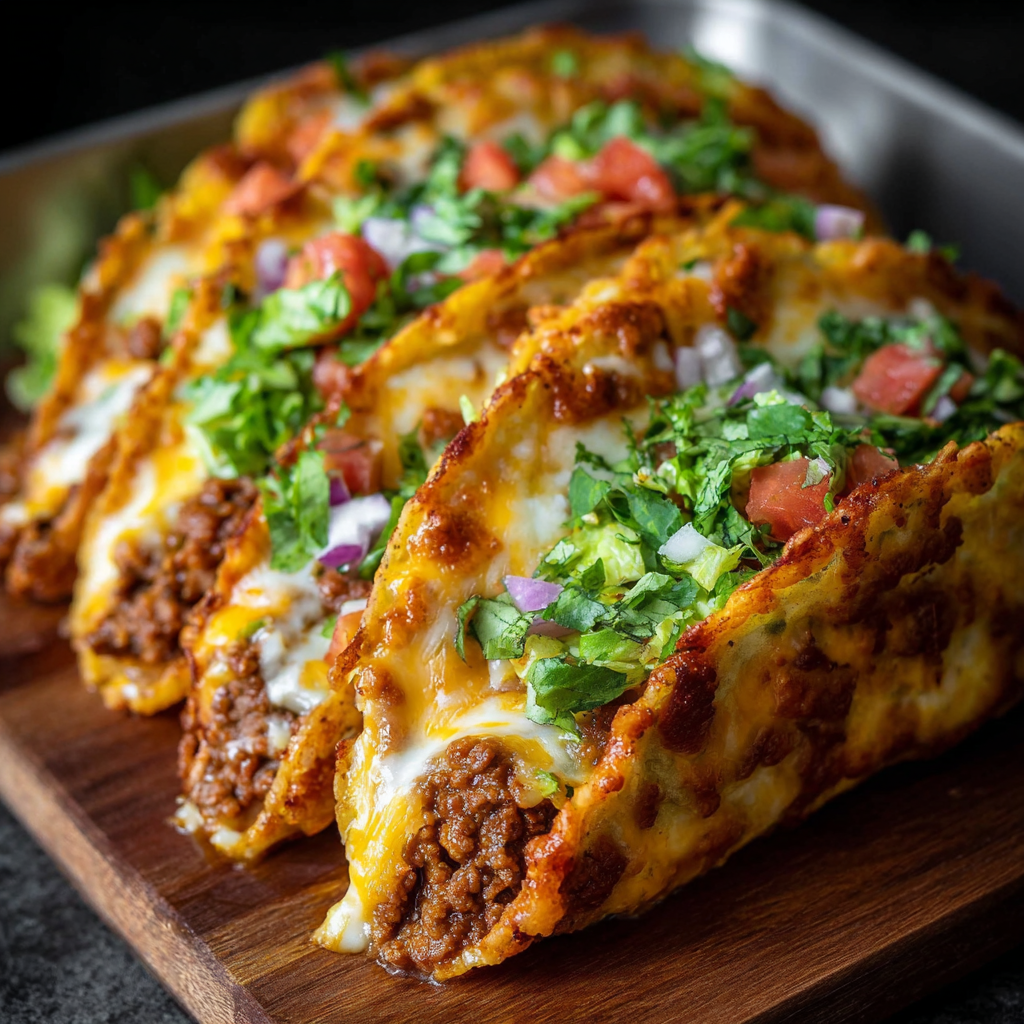
- 8 hard taco shells: Use good-quality corn shells for traditional texture or flour shells if your family prefers them; warm briefly before filling to prevent breakage.
- 2 cups shredded cheese: Cheddar, Monterey Jack, or a Mexican blend melt well; shred from a block for best melting performance.
- Toppings: 1 cup shredded lettuce, 1/2 cup diced tomatoes, 1/4 cup diced red onion, 2 tablespoons chopped cilantro, plus optional sour cream, guacamole, jalapeño slices, and hot sauce for finishing.
Instructions
Step 1 — Preheat and prep: Set the oven to 375°F (190°C). Line a baking sheet with foil and arrange a wire rack or use a baking tray with sides; the rack helps air circulate and keeps shells crisp. Measure out the cheese and prepare toppings so assembly is smooth. Step 2 — Brown the beef: In a large skillet over medium-high heat, add the ground beef and diced onion. Break the meat into pieces and cook until no longer pink, about 6–8 minutes. Drain excess fat if there's more than a tablespoon, then return to heat. Add the minced garlic and cook one minute until fragrant. Step 3 — Season and simmer: Stir in the taco seasoning and 2/3 cup tomato sauce or salsa. Reduce heat to low and simmer for 3–5 minutes, stirring occasionally, until the mixture thickens slightly and is well combined. Taste and adjust salt and pepper; if using store-bought seasoning, start with half and add more to taste to control sodium. Step 4 — Assemble the shells: Spoon about 2 to 3 tablespoons of the filling into each hard shell — enough to fill but not overstuff. Place on the prepared baking sheet so they stand upright (use the edge of another baking sheet to cradle them if needed). Sprinkle about 2 tablespoons of shredded cheese over each filled shell, covering the filling. Step 5 — Bake until melty: Place the tray in the preheated oven and bake for 10–12 minutes, or until the cheese is melted and starting to bubble and the shells are crisp but not browned. For extra crispness, broil for 30–60 seconds at the end, watching carefully to prevent burning. Step 6 — Finish and serve: Remove from the oven and let cool for 1–2 minutes. Top with shredded lettuce, diced tomatoes, red onion, cilantro, and any optional garnishes like sour cream, guacamole, or jalapeños. Serve immediately for best texture.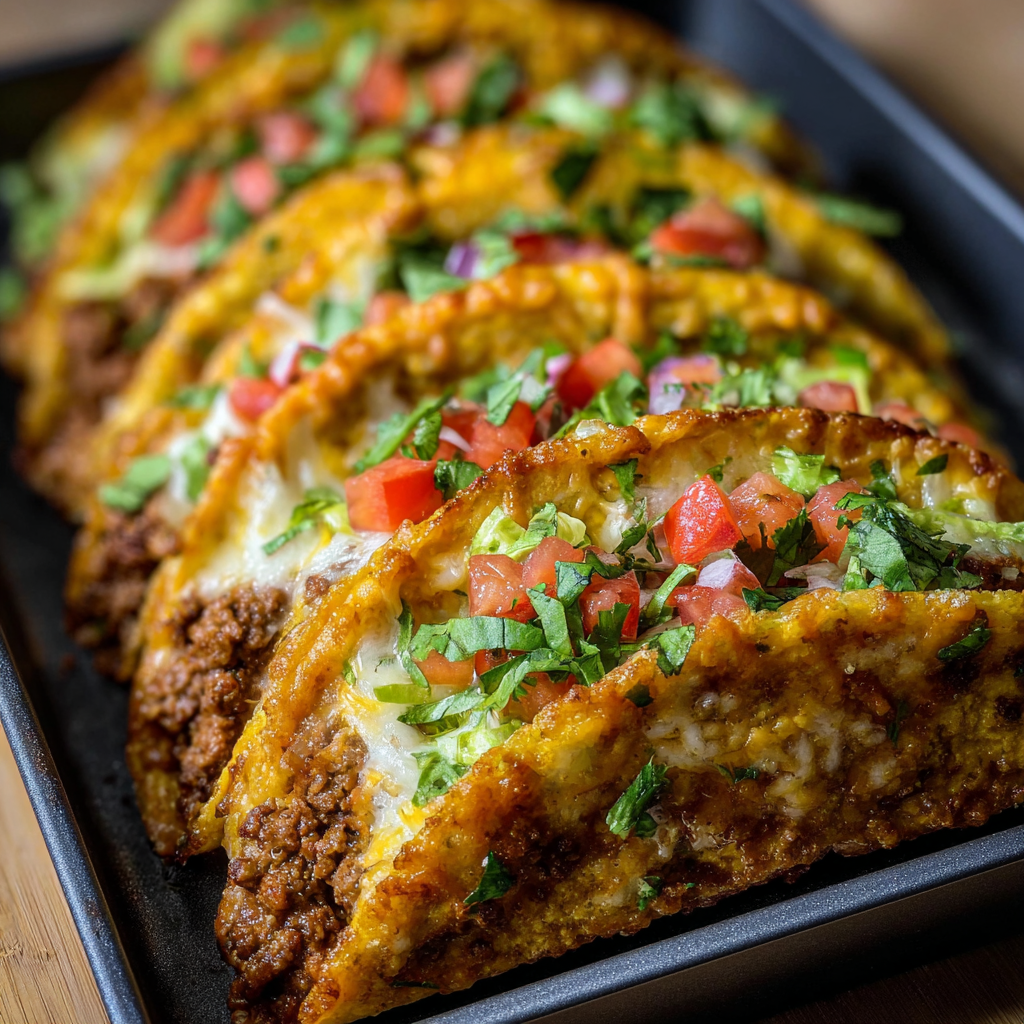
You Must Know
- These tacos freeze well if you assemble shells without lettuce and freeze on a sheet tray until solid; transfer to a freezer bag for up to 3 months. Reheat at 350°F (175°C) covered for 10–12 minutes, then broil briefly to refresh crunch.
- High in protein and fat from beef and cheese; to lower calories, use lean turkey and reduced-fat cheese, or load up on veggies and skip sour cream.
- Use fresh-shredded cheese rather than pre-shredded for better melt and smoother texture because pre-shredded often contains anti-caking agents that inhibit melting.
- Store leftovers in an airtight container in the refrigerator for up to 3 days; reheat in the oven or toaster oven to preserve crispness rather than the microwave, which can make shells soggy.
My favorite thing about this approach is how forgiving it is: timing is flexible, and you can easily scale quantities. At a recent casual dinner I swapped half the beef for black beans and a smoky chipotle salsa, and the combo was a surprising hit — guests loved the texture contrast and the smoky undertone.
Storage Tips
To store leftover tacos, remove any fresh greens or guacamole first. Place tacos in a single layer in an airtight container and refrigerate for up to 3 days. For longer storage, freeze assembled tacos without fresh toppings: freeze on a sheet tray until solid, then transfer to a freezer-safe bag for up to 3 months. When reheating, preheat the oven to 350°F (175°C), place frozen tacos on a baking sheet, cover loosely with foil, and heat for 12–18 minutes until warmed through; remove foil and broil 30–60 seconds to crisp. For refrigerated leftovers, reheat at 350°F for 8–10 minutes uncovered to avoid steam build-up.

Ingredient Substitutions
If you want to lighten the profile, substitute 1 lb ground turkey or chicken and add 1 tablespoon olive oil during sauté to keep moisture. For vegetarian options, use 16 oz of drained cooked lentils or a plant-based crumbled product. Swap tomato sauce for 2/3 cup chunky salsa for extra texture, or use canned diced tomatoes drained if you prefer less sauciness. Replace hard shells with soft tortillas folded and baked on edge-to-edge in a muffin tin for individual handhelds. For dairy-free needs, use a plant-based melting cheese and skip sour cream; many vegan cheeses melt nicely in the oven if shredded from a block.
Serving Suggestions
Serve these tacos with a simple side of cilantro-lime rice, black beans, or a crunchy cabbage slaw to add brightness. Garnish with lime wedges for squeezing and offer a selection of salsas — pico de gallo, smoky chipotle, and green tomatillo — so guests can customize. They work well as a main course for casual dinners or cut in halves to serve as an appetizer at parties. Pair with a light Mexican lager or a citrusy margarita for a festive touch.
Cultural Background
These tacos are inspired by Tex-Mex traditions that emphasize bold flavors, melting cheese, and convenience. While classic Mexican tacos often focus on minimal fillings and salsas, the baked cheesy version became popular in American kitchens for its ease and universal appeal. The combination of seasoned beef and cheese echoes longtime comfort-food pairings in southwestern cuisine, adapted for oven convenience to satisfy busy modern households.
Seasonal Adaptations
Adjust the toppings by season: in summer, add grilled corn kernels and chopped ripe avocado; in fall, top with pickled red onions and roasted poblano strips for a smoky twist. For winter, fold in roasted sweet potato cubes into the filling for a heartier, slightly sweet note. Holiday gatherings welcome a topping station with festive salsas and chopped roasted chiles for a comfortable, make-your-own spread.
Meal Prep Tips
For efficient meal prep, prepare the seasoned beef up to two days in advance and store in the refrigerator. Shred cheese and dice toppings into separate airtight containers. On the day you plan to serve, warm the filling briefly on the stove, assemble shells, and bake for best texture. For grab-and-go lunches, reheat a single taco in a toaster oven and pack fresh lettuce and tomato separately to maintain crunch.
These oven-baked cheesy tacos are a small ritual of comfort — quick to make, easy to share, and endlessly adaptable. Make them your own by experimenting with fillings and toppings, and don’t be surprised if they become a requested weekly favorite in your household.
Pro Tips
Shred cheese from a block for better melt and creamier texture compared to pre-shredded cheese.
Warm taco shells briefly on a wire rack in a low oven before filling to reduce breakage when stuffing.
If the filling seems dry, stir in up to 1–2 tablespoons water or extra salsa while reheating to restore moisture.
Broil for no more than 30–60 seconds at the end of baking to avoid burning the cheese — watch closely.
This nourishing oven-baked cheesy tacos recipe is sure to be a staple in your kitchen. Enjoy every moist, high protein slice — it is perfect for breakfast or as a wholesome snack any time.
Tags
Oven-Baked Cheesy Tacos
This Oven-Baked Cheesy Tacos recipe makes perfectly juicy, tender, and flavorful steak every time! Serve with potatoes and a side salad for an unforgettable dinner in under 30 minutes.
Ingredients
Filling
Shells & Cheese
Toppings
Instructions
Preheat and Prep
Preheat oven to 375°F (190°C). Line a baking sheet with foil and set a wire rack if available. Measure and prepare toppings and cheese so assembly moves quickly.
Brown the Meat
In a large skillet over medium-high heat, cook 1 lb ground beef with 1 small diced onion, breaking up meat until no longer pink, about 6–8 minutes. Drain excess fat if necessary and add 2 minced garlic cloves for the last minute.
Season and Simmer
Stir in the taco seasoning packet and 2/3 cup tomato sauce or salsa. Reduce heat to low and simmer 3–5 minutes until slightly thickened. Taste and adjust salt and pepper.
Assemble Shells
Spoon 2–3 tablespoons of filling into each hard shell. Arrange shells upright on the prepared baking sheet and top each with about 2 tablespoons of shredded cheese.
Bake Until Melty
Bake at 375°F (190°C) for 10–12 minutes until cheese is melted and bubbling. Optionally broil 30–60 seconds to brown cheese, watching closely to prevent burning.
Finish and Serve
Remove from oven and cool 1–2 minutes. Top with shredded lettuce, diced tomatoes, red onion, cilantro and optional garnishes. Serve immediately for best texture.
Last Step: Please leave a rating and comment letting us know how you liked this recipe! This helps our business to thrive and continue providing free, high-quality recipes for you.
Nutrition
Did You Make This?
Leave a comment & rating below or tag
@festive-cooks on social media!
Categories:
You might also like...

Air Fryer Apple Fries
Crispy, cinnamon-sugar coated apple fries made in the air fryer — a quick, family-friendly snack or dessert ready in under 30 minutes.

Air Fryer Bacon Cheese Croissants
Golden, flaky croissants filled with ham, melted cheddar and Swiss, finished with a glossy egg wash and cooked in the air fryer for quick, crowd pleasing results.

Air Fryer Bang Bang Cauliflower
Crispy air fryer cauliflower tossed in a creamy sweet-spicy bang bang sauce for a crowd-pleasing, quick appetizer or weeknight treat.
Did You Make This?
Leave a comment & rating below or tag @festive-cooks on social media!
Rate This Recipe
Share This Recipe
Enjoyed this recipe? Share it with friends and family, and don't forget to leave a review!
Comments (1)
This recipe looks amazing! Can't wait to try it.
Comments are stored locally in your browser. Server comments are displayed alongside your local comments.

Hi, I'm Jessica!
What's Popular

30-Minute Meals!
Join to receive our email series which contains a round-up of some of our quick and easy family favorite recipes.