
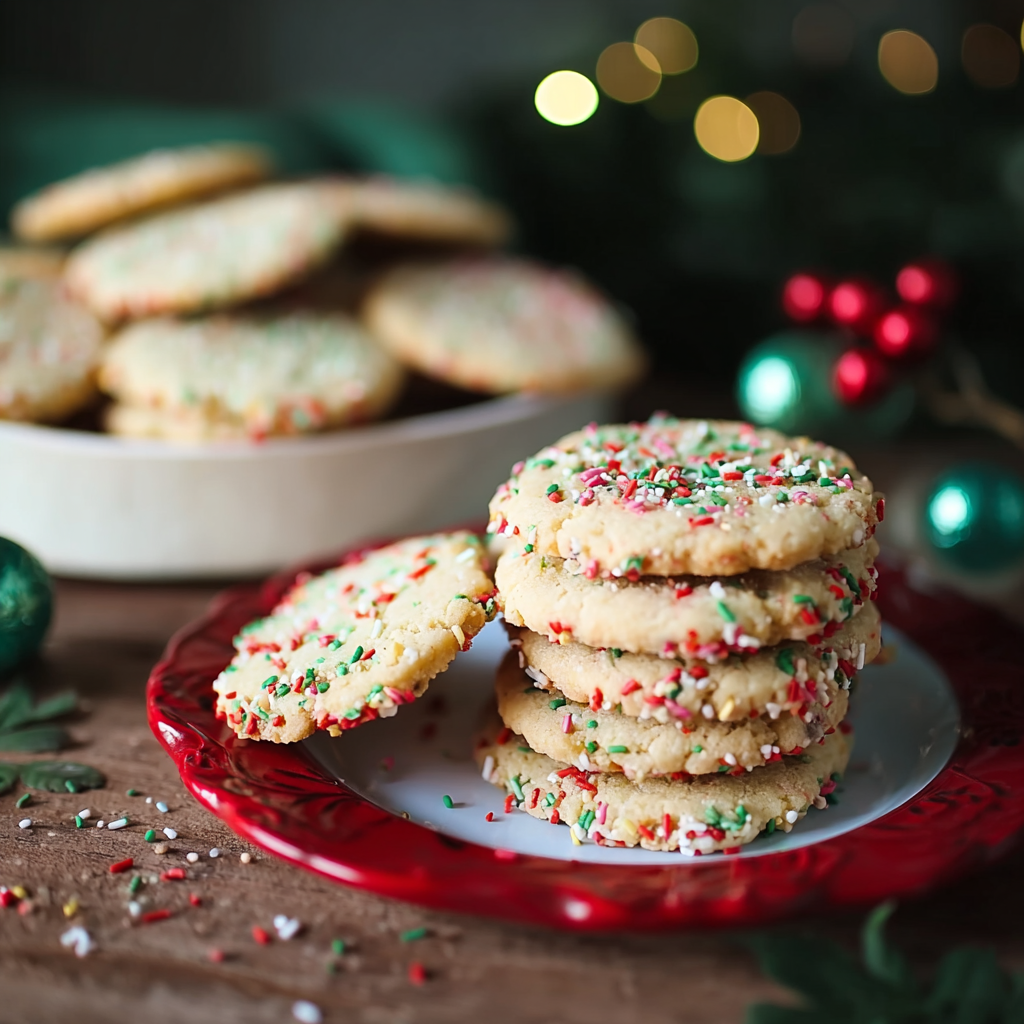
Easy Slice and Bake Cookies

Classic slice-and-bake cookies with a tender, buttery crumb and a festive outer coat of sprinkles—perfect for make-ahead baking and easy gifting.
This recipe for Easy Slice and Bake Cookies has been a go-to whenever I want a fuss-free, crowd-pleasing cookie that looks special without hours of hands-on work. I first learned the technique from a neighbor who always had a log of dough in her freezer for last-minute visitors; the simplicity and reliability stuck with me. These cookies deliver a crisp edge and a tender center, with a buttery, buttery flavor that pairs beautifully with a hint of vanilla and almond.
I often make these when I need a batch for school parties, cookie swaps, or just a simple sweet treat on a busy afternoon. The dough forms into logs that can be chilled, sliced, and baked on demand—so you can keep one log in the freezer and bake fresh cookies whenever you want. Sprinkles give them a playful, festive look that makes them feel celebratory even on an ordinary Tuesday.
Why You'll Love This Recipe
- Ready in active time under 30 minutes: the hands-on assembly takes about 20 minutes, then the dough chills while you get on with other tasks.
- Makes a large batch that freezes beautifully—prepare ahead and bake only what you need for fresh cookies every time.
- Uses pantry-friendly ingredients you likely already have: butter, sugar, egg, flour, and basic extracts.
- Flexible appearance: roll in sprinkles, nonpareils, or leave plain for a crisp, buttery edge with a soft center.
- Beginner-friendly technique: no piping, no scooping—just shape into logs and slice for even cookies every bake.
- Great for gifting and parties: wraps neatly and travels well when stored airtight.
I remember the first time I shared these at a holiday potluck—people assumed I’d spent all morning rolling and decorating, but the truth was I pulled prepped dough from the freezer and baked them in two trays. They were gone in minutes, and I loved that small, smug satisfaction of an easy success.
Ingredients
- Unsalted butter (1 cup): Use real butter at room temperature for the best flavor and proper creaming. European-style brands will add richness; leave out to soften but not melt.
- Granulated sugar (1 1/2 cups): Provides structure and a lightly crisp edge; measure by spooning into the cup and leveling for accuracy.
- Large egg (1): Adds moisture and binds the dough. Use a room-temperature egg so the batter emulsifies smoothly when creaming with butter.
- Vanilla extract (2 teaspoons): Choose pure vanilla extract for deep aroma; imitation works in a pinch but lacks complexity.
- Almond extract (1 teaspoon): A little goes a long way—this accent brightens the buttered flavor. Use gluten-free if needed or omit for a milder profile.
- Salt (1/2 teaspoon): Balances sweetness and enhances the buttery notes—fine salt measures most consistently here.
- All-purpose flour (2 1/4 cups): Provides the structure. Spoon and level when measuring to avoid a dense dough; if you prefer softer cookies, reduce by 1 to 2 tablespoons.
- Sprinkles (as desired): Nonpareils or small jimmies work best for an even coating. Place on a shallow plate for easy rolling of the logs.
Instructions
Cream the butter and sugar: In a stand mixer fitted with the paddle or using a hand mixer, beat 1 cup softened unsalted butter with 1 1/2 cups granulated sugar on medium-high until pale and smooth, about 2 to 3 minutes. Proper creaming incorporates air for a lighter texture; scrape down the bowl once to ensure even mixing. Incorporate the egg and extracts: Add 1 large room-temperature egg, 2 teaspoons vanilla extract, and 1 teaspoon almond extract to the creamed butter. Mix on medium speed until fully combined, about 30 to 45 seconds. The mixture should look glossy and homogeneous—if it splits slightly, continue beating briefly and it will come together. Add salt and flour: Sift or spoon in 1/2 teaspoon salt and 2 1/4 cups all-purpose flour. Mix on low speed just until the dough comes together and there are no streaks of flour, about 20 to 30 seconds. Overmixing can develop gluten and make the cookies tough, so stop as soon as the dough is cohesive. Form into logs: Divide the dough roughly in half. Place each portion on a large double layer of plastic wrap. Use the plastic wrap to shape each portion into a log about 2 1/2 inches wide and 8 to 10 inches long. Don’t worry if the logs feel soft; chilling will firm them up. Chill thoroughly: Wrap the logs tightly in plastic wrap and chill in the refrigerator for at least 4 hours, or freeze for up to 3 months. Chilling makes slicing cleaner and helps the cookies keep their shape while baking. Preheat and prepare baking sheet: When ready to bake, preheat the oven to 350°F (176°C). Line a baking sheet with parchment paper or a silicone mat to prevent spreading and make cleanup easier. Define the log shape and coat with sprinkles: Take one log out and roll it (still in the plastic wrap) to refine the roundness. For a decorative edge, pour sprinkles onto a shallow plate, remove the wrap, and roll the log through the sprinkles so the exterior is evenly coated. Slice and bake: Slice the log into 1/4-inch-thick rounds and place them on the prepared sheet about 1 inch apart. Bake for 10 to 12 minutes, until the edges barely begin to turn light golden brown. For softer centers, aim for 10 minutes; for crispier cookies bake toward 12 minutes. Cool and store: Let the cookies cool on the baking sheet for 5 minutes, then transfer to a wire rack to cool completely. Store cooled cookies in an airtight container at room temperature up to two weeks or freeze tightly wrapped up to 12 months.
You Must Know
- These cookies freeze exceptionally well—wrap logs tightly and they’ll keep in the freezer for up to 3 months for truly fresh baking on demand.
- Chill time is essential: at least 4 hours in the refrigerator gives the best sliced shape; freezing accelerates this if you’re short on time.
- Cookies will be slightly soft out of the oven but firm as they cool; removing them too early can cause breakage, so allow the five-minute sheet rest.
- Nutrition-wise, expect roughly 120–150 calories per cookie depending on size and sprinkle use; they’re a sweet, occasional treat rather than an everyday snack.
- For even baking, use a light-colored baking sheet and space cookies to allow airflow—overcrowding can produce uneven browning.
My favorite part of this technique is how much time it saves during busy seasons: I’ll make several logs, freeze a couple, and then bake two trays for guests without any last-minute fuss. Family and friends always compliment the look and texture, and it’s rewarding to share something that feels homemade without a marathon baking session.
Storage Tips
Store cooled cookies in an airtight container at room temperature for up to two weeks; place a slice of bread in the container to help maintain softness if desired. For longer storage, wrap individual logs tightly in plastic and foil before freezing to prevent freezer burn—logs will keep up to 3 months. When ready to bake from frozen, slice directly (they will be firm) and add an extra minute or two to the bake time. For already baked cookies, freeze on a sheet until solid, then transfer to a sealed container for best texture preservation.
Ingredient Substitutions
If you need to modify the recipe: swap salted butter for unsalted but reduce added salt to 1/4 teaspoon. For a dairy-free approach use a firm stick-style vegan butter and increase chilling time. Replace almond extract with an equal amount of extra vanilla if nut allergies are a concern. For gluten-free, use a 1-to-1 gluten-free blend, but expect slightly different spread and texture—chill longer and consider adding 1 to 2 teaspoons of xanthan gum if your blend lacks it.
Serving Suggestions
Serve these with a simple hot chocolate or a creamy latte for a cozy afternoon pairing. For parties, arrange assorted sprinkles by log—use nonpareils, metallics, or seasonal shapes—and slice a variety of coated edges for a colorful platter. They look charming stacked in parchment-wrapped stacks tied with twine for gifts, or paired alongside citrus cookies and brownies for a dessert board with texture contrast.

Cultural Background
The slice-and-bake method has roots in European baking where doughs like shortbread and butter cookies were shaped into rolls for efficient slicing and even baking. This approach traveled widely because it allows quick, consistent portions and was particularly useful in home kitchens before modern refrigeration. Today it is a staple technique for producing biscuits, cookies, and even some savory items—prized for its time-saving convenience and the ability to make baked goods ahead without sacrificing freshness.
Seasonal Adaptations
For holidays, swap sprinkles to match the season—red and green for winter, pastels for spring. Add 1 to 2 teaspoons of citrus zest for bright summer flavors or fold in 1/2 cup finely chopped, toasted nuts in autumn for warmth and texture. Spices such as 1/2 teaspoon ground ginger or cardamom can easily transform the base for themed occasions without altering technique or chilling times significantly.
Meal Prep Tips
Make multiple logs at once and freeze extras for a month of quick baking: shape, wrap, label with date, and stack in a single freezer-safe bag. When prepping for the week, slice several rounds and place between parchment squares for grab-and-bake portions—bake from chilled and add one minute to the time. Use a digital scale to portion dough for perfectly even logs if you want consistent cookie sizes every bake.
These cookies are simple, adaptable, and reliably delightful—once you master the log technique you’ll find yourself reaching for it more than you expect. Bake a batch, share a stack, and enjoy how an easy method can still feel celebratory.
Pro Tips
Beat butter and sugar until pale and fluffy to incorporate air for a lighter texture.
Use room-temperature egg and butter for smoother emulsion and consistent dough.
If dough is too soft to shape, freeze for 15–20 minutes to firm before rolling into logs.
Roll logs in sprinkles on a shallow plate for an even decorative coating.
Slice logs with a sharp knife chilled between handles under hot water for cleaner cuts.
This nourishing easy slice and bake cookies recipe is sure to be a staple in your kitchen. Enjoy every moist, high protein slice — it is perfect for breakfast or as a wholesome snack any time.
FAQs about Recipes
How long should I chill the dough?
Chill the dough logs at least 4 hours or freeze for quicker firming. If baking from frozen, add 1 to 2 minutes to the bake time.
Can I freeze the dough?
Yes—wrap logs tightly and store in the freezer up to 3 months. Slice and bake directly from frozen with slightly longer bake time.
What bake time and temperature should I use?
Bake at 350°F for 10 to 12 minutes; remove when edges are just turning light golden for tender centers.
Tags
Easy Slice and Bake Cookies
This Easy Slice and Bake Cookies recipe makes perfectly juicy, tender, and flavorful steak every time! Serve with potatoes and a side salad for an unforgettable dinner in under 30 minutes.
Ingredients
Dough
Decoration
Instructions
Cream butter and sugar
Beat 1 cup softened unsalted butter with 1 1/2 cups granulated sugar until pale and smooth, about 2 to 3 minutes. Scrape the bowl once for even mixing.
Add egg and extracts
Add 1 large room-temperature egg, 2 teaspoons vanilla, and 1 teaspoon almond extract. Mix until glossy and combined, about 30–45 seconds.
Incorporate salt and flour
Add 1/2 teaspoon salt and 2 1/4 cups all-purpose flour on low speed until the dough just comes together—stop to avoid overmixing.
Shape into logs
Divide dough in half and form each portion into a 2 1/2-inch-wide log using plastic wrap. The dough may be soft; aim for even width rather than perfect length.
Chill
Wrap logs tightly and refrigerate at least 4 hours or freeze for longer storage. Chilling firms the dough for cleaner slicing.
Coat with sprinkles
Roll chilled logs through sprinkles on a shallow plate to coat the outside, then remove plastic wrap carefully before slicing.
Slice and bake
Preheat oven to 350°F. Slice logs into 1/4-inch rounds, place on parchment-lined sheet, and bake 10–12 minutes until edges are lightly golden.
Cool and store
Cool on the sheet for 5 minutes, transfer to a wire rack to cool completely, and store in an airtight container at room temperature up to two weeks.
Last Step: Please leave a rating and comment letting us know how you liked this recipe! This helps our business to thrive and continue providing free, high-quality recipes for you.
Nutrition
Did You Make This?
Leave a comment & rating below or tag
@festive-cooks on social media!
Categories:
You might also like...

Air Fryer Apple Fries
Crispy, cinnamon-sugar coated apple fries made in the air fryer — a quick, family-friendly snack or dessert ready in under 30 minutes.

Air Fryer Bacon Cheese Croissants
Golden, flaky croissants filled with ham, melted cheddar and Swiss, finished with a glossy egg wash and cooked in the air fryer for quick, crowd pleasing results.

Air Fryer Bang Bang Cauliflower
Crispy air fryer cauliflower tossed in a creamy sweet-spicy bang bang sauce for a crowd-pleasing, quick appetizer or weeknight treat.
Did You Make This?
Leave a comment & rating below or tag @festive-cooks on social media!
Rate This Recipe
Share This Recipe
Enjoyed this recipe? Share it with friends and family, and don't forget to leave a review!
Comments (1)
This recipe looks amazing! Can't wait to try it.
Comments are stored locally in your browser. Server comments are displayed alongside your local comments.

Hi, I'm Jessica!
What's Popular

30-Minute Meals!
Join to receive our email series which contains a round-up of some of our quick and easy family favorite recipes.