
Creamy Raspberry Cheesecake

A dreamy, no-fuss raspberry cheesecake with a buttery graham crust and a silky cream cheese layer, topped with a bright homemade raspberry filling — perfect for celebrations and weeknight treats.
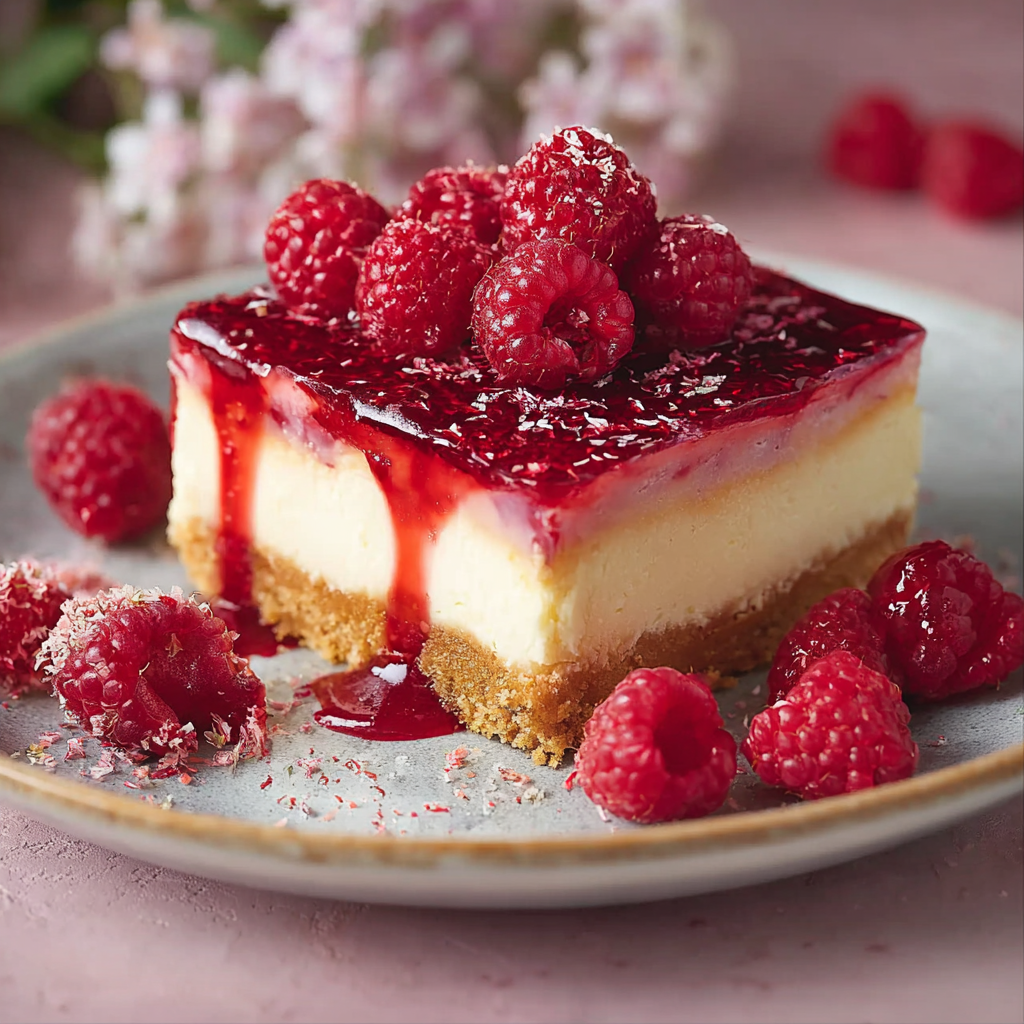
This creamy raspberry cheesecake has been my go-to for birthdays and small gatherings ever since I first tested it on a rainy Sunday afternoon. I discovered the balance between a tender graham crust, a luxuriously smooth cream cheese layer, and a bright, slightly tangy raspberry topping while experimenting with pantry staples and a bag of frozen raspberries. What makes it special is the contrast of textures: the slightly crunchy, buttery base, the pillowy cream layer that melts on the tongue, and the jewel-like ribbon of raspberry that cuts through the richness.
I usually prepare this one when I want something impressive but not fussy. It’s forgiving: you can make the filling with frozen raspberries, swap whipped topping for freshly whipped cream, and either chill the crust or give it a light bake for extra stability. Guests always comment on the vibrant raspberry swirls and the smooth, airy filling — it’s a dessert that looks elegant on the table yet comes together with surprisingly little stress.
Why You'll Love This Recipe
- Make-ahead friendly: the cheesecake improves after a few hours in the fridge, and it can be assembled a day ahead for stress-free entertaining.
- Quick preparation: active work time is about 25 minutes, and the raspberry topping cooks in roughly 10 minutes.
- Accessible ingredients: uses pantry staples like graham crackers, sugar, and cornstarch; fresh or frozen raspberries both work.
- Customizable richness: use whipped topping for a lighter texture or 4 cups of freshly whipped cream for a richer finish.
- Kid-friendly and crowd-pleasing: the sweet-tart topping makes this approachable even for picky eaters.
- Two finishing options: bake the crust for a firmer base or chill it for a softer, no-bake version.
In my kitchen this recipe is the one guests ask for most. I first served it at a family potluck and watched the platter disappear — cousins who usually skip dessert went back for seconds. I love that it looks impressive with the raspberry ribbons yet is forgiving enough that the filling can be smoothed by hand or with a small offset spatula. Over the years I've learned small tricks — like sifting the confectioners' sugar and warming the raspberries only until glossy — that make a noticeable difference.
Ingredients
- Graham cracker crumbs (1 1/2 cups): Use finely crushed graham crackers such as Nabisco Honey Maid for an even crust. Fine crumbs pack better and give a uniform texture; pulse in a food processor for 10–15 seconds.
- Sugar for crust (1/4 cup): Regular granulated sugar sweetens and helps set the crust when combined with melted butter.
- Melted butter (1/2 cup): Unsalted butter melted and cooled slightly binds the crumbs; I prefer European-style butter for depth of flavor but standard salted or unsalted works fine.
- Whipped topping or fresh whipped cream (16 oz or 4 cups fresh): Use store-bought whipped topping for consistency and convenience, or whip 2 cups of heavy cream with 1/4 cup sugar for a richer, silkier layer.
- Cream cheese (11 oz, softened): Full-fat cream cheese like Philadelphia yields the creamiest texture. Bring to room temperature to avoid lumps when mixing.
- Vanilla extract (1 tsp): Madagascar vanilla adds floral notes; pure vanilla extract is highly recommended over imitation.
- Confectioners' sugar (1 1/2 cups): Sifted to prevent grit; confectioners' sugar sweetens and stabilizes the filling.
- Milk (3 tbsp): Adds looseness; use whole milk for richness or skim for a lighter version.
- Raspberries (2 cups): Fresh or frozen (thawed) both work. For fewer seeds, press the cooked mixture through a fine mesh sieve.
- Water (1/2 cup) and sugar (1/2 cup) for the topping: These provide the syrup base for the raspberry filling.
- Lemon juice (1 tsp): Brightens the fruit and balances the sweetness.
- Cornstarch (2 tbsp): Mixed with a little cold water to form a slurry, this thickens the topping quickly without clouding the color.
Instructions
Prepare the crust:Combine 1 1/2 cups finely crushed graham crackers with 1/4 cup granulated sugar in a bowl. Stir in 1/2 cup melted butter until evenly moistened. Press the mixture firmly into the bottom (and slightly up the sides if desired) of a 9-inch springform or pie pan. For a no-bake finish, chill for 30 minutes; for a firmer texture, bake at 350°F (175°C) for 8–10 minutes, then cool completely.Make the cream layer:In a large bowl, beat 11 oz softened cream cheese until smooth and lump-free. Add 1 1/2 cups sifted confectioners' sugar and 1 tsp vanilla; beat until combined. Gently fold in 16 oz whipped topping (or fold in 4 cups freshly whipped cream) and 3 tbsp milk to achieve a silky, spreadable texture. Taste and adjust sweetness lightly if needed.Assemble the base layer:Spread the cream cheese mixture evenly over the cooled crust with an offset spatula. Smooth the top and chill the assembled base in the refrigerator for at least 1 hour to firm up before adding the raspberry topping.Cook the raspberry filling:In a small saucepan, combine 2 cups raspberries, 1/2 cup water, 1/2 cup sugar, and 1 tsp lemon juice. Bring to a gentle simmer over medium heat, stirring occasionally. Mix 2 tbsp cornstarch with 2 tbsp cold water to form a slurry and whisk into the simmering fruit. Continue to cook 1–2 minutes until glossy and thickened. Remove from heat. For a seedless topping, press through a fine mesh sieve; otherwise leave whole for texture. Let cool to room temperature before topping the chilled cake.Finish and chill:Gently spoon or pour the cooled raspberry filling over the cream layer, using the back of a spoon to create some decorative swirls. Cover and chill for at least 4 hours, preferably overnight, to allow flavors to meld and the filling to set. Serve chilled.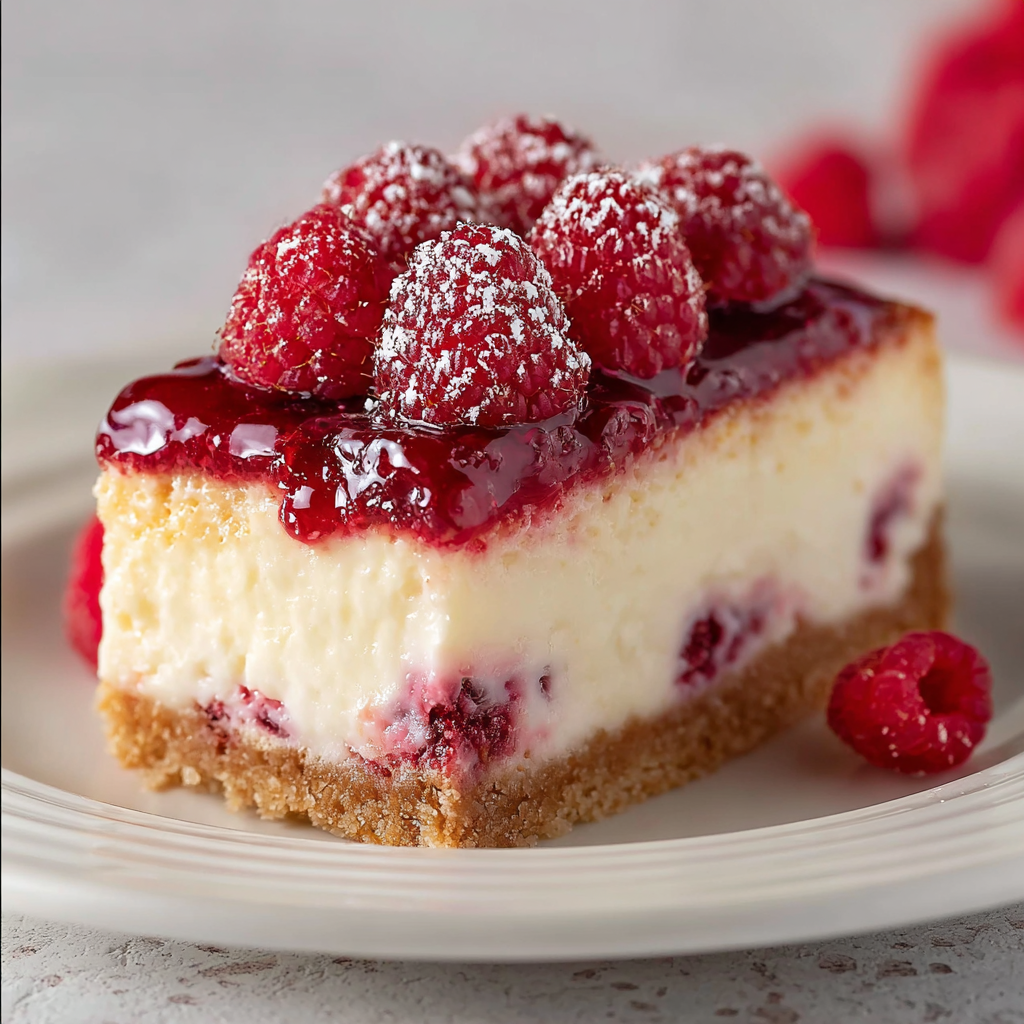
You Must Know
- The dessert keeps best refrigerated and will hold its texture for up to 3 days if covered well; for longer storage, freeze slices for up to 1 month.
- This is not gluten-free unless you substitute gluten-free graham crackers; the filling is naturally gluten-free if you use cornstarch that is certified GF.
- Switching to fresh whipped cream increases richness and shortens shelf life slightly — plan to serve within 48 hours if using fresh cream.
- The raspberry topping can be made ahead and refrigerated separately for up to 3 days; warm gently to loosen before spooning over the cake.
My favorite thing about this version is the balance. The raspberries are tart enough to cut through the creaminess, and the texture contrast is what guests always remark on. I remember making this for a summer birthday where the kitchen was too hot for a heavy oven dessert: the chilled slices were cool and refreshing, and I got compliments on how light it felt despite being richly flavored. Over time I've adjusted the sweetness and texture to suit both winter and summer meals, and it remains a versatile showstopper.
Storage Tips
Store covered in the refrigerator on a flat surface to maintain the layer structure — I use a cake carrier or wrap the springform pan in plastic. Chilled slices keep well for up to 3 days; the filling is most stable after at least 4 hours of chilling. To freeze, wrap individual slices tightly in plastic wrap and place in a freezer-safe container for up to a month. Thaw overnight in the refrigerator and serve slightly chilled; avoid microwaving as it alters texture. If you baked the crust, the base stays firmer after freezing and reheating, making a baked crust preferable when planning to freeze.

Ingredient Substitutions
If you want a gluten-free base, use gluten-free graham crackers or finely ground almond meal mixed with 2–3 tbsp extra melted butter for structure. Swap the whipped topping for 4 cups of whipped heavy cream for a richer mouthfeel; stabilize whipped cream with 1 tsp gelatin if you need longer holding time. For a lighter version, use reduced-fat cream cheese and light whipped topping, but expect a slightly less luxurious texture. If raspberries are out of season, substitute strawberries or cherries and adjust sugar to taste; berries with lower natural sugar may need an extra tablespoon or two of sugar to reach the right balance.
Serving Suggestions
Serve slices with a few fresh raspberries and a mint sprig for contrast. This dessert pairs beautifully with a cup of espresso or a late-harvest Riesling for a sweeter contrast. For a brunch twist, top individual slices with a dollop of Greek yogurt and a drizzle of honey. Consider serving smaller portions alongside a fruit salad to balance richness, or present as single-serving parfaits layered in glasses for an elegant buffet option.
Seasonal Adaptations
In summer, use fresh raspberries and a higher proportion of fresh whipped cream for brightness. In winter, frozen thawed raspberries work well; add a pinch of ground cinnamon or orange zest to the topping for warmth. For holiday occasions, fold a spoonful of cranberry-orange compote into the raspberry topping to add depth and a festive note. You can also add a thin layer of melted dark chocolate between the crust and the cream layer for a winter dessert with extra indulgence.
Meal Prep Tips
Make the crust and raspberry topping a day ahead and keep them chilled separately. Prepare the cream layer the day you plan to serve to keep it as fresh and airy as possible. Use airtight containers: the topping in a small jar and the cream layer in the springform pan. When transporting, lock the chilled pan in a sturdy carrier and surround it with cold packs to maintain temperature. Time-wise, allocate 25 minutes active prep and plan for at least 4 hours chill time (overnight preferred) to ensure clean slices.
Success Stories
I remember delivering this cheesecake to a neighbor recovering from surgery — she called the next day to say it brightened her week. Another time, I swapped the whipped topping for freshly whipped cream and served it at a small wedding rehearsal dinner; the couple loved that it felt both elegant and homey. Readers have told me they appreciate the forgiving nature of the recipe: one emailed that using frozen raspberries saved their holiday plan when fresh fruit was unavailable, and everyone still raved about the flavor.
This raspberry cheesecake is a dessert I make when I want something that feels celebratory but not fussy. I hope you enjoy making it — adapt it, share it, and make it your own.
Pro Tips
Bring cream cheese to room temperature before mixing to avoid lumps and achieve a perfectly smooth filling.
Sift confectioners' sugar to prevent grittiness and ensure a silky texture.
Chill the assembled dessert for at least 4 hours (overnight preferred) to allow clean slicing and flavor melding.
Use a thin offset spatula to smooth layers and a hot towel between cuts for clean slices.
This nourishing creamy raspberry cheesecake recipe is sure to be a staple in your kitchen. Enjoy every moist, high protein slice — it is perfect for breakfast or as a wholesome snack any time.
FAQs about Recipes
Can I use frozen raspberries?
Yes — you can use frozen raspberries. Thaw them first and drain excess liquid before cooking; the cooked topping will still thicken properly with the cornstarch slurry.
Do I need to bake the crust?
If you prefer a firmer base, pre-bake the crust at 350°F for 8–10 minutes, then cool completely before adding the filling.
Tags
Creamy Raspberry Cheesecake
This Creamy Raspberry Cheesecake recipe makes perfectly juicy, tender, and flavorful steak every time! Serve with potatoes and a side salad for an unforgettable dinner in under 30 minutes.
Ingredients
Crust
Cream Cheese Layer
Raspberry Filling
Instructions
Prepare the crust
Mix graham crumbs with sugar and melted butter, press into a 9-inch pan. Chill 30 minutes or bake at 350°F for 8–10 minutes for a firmer crust, then cool.
Make the cream layer
Beat softened cream cheese until smooth, add sifted confectioners' sugar and vanilla. Fold in whipped topping or fresh whipped cream and milk until silky.
Assemble and chill base
Spread cream mixture evenly over cooled crust and chill at least 1 hour to firm before topping with raspberry filling.
Cook the raspberry topping
Simmer raspberries with water, sugar, and lemon juice. Stir in cornstarch slurry and cook until glossy and thickened; cool to room temperature before using.
Finish and serve
Spoon cooled raspberry filling over the chilled cream layer, swirl if desired, and chill at least 4 hours or overnight before slicing and serving.
Last Step: Please leave a rating and comment letting us know how you liked this recipe! This helps our business to thrive and continue providing free, high-quality recipes for you.
Nutrition
Did You Make This?
Leave a comment & rating below or tag
@festive-cooks on social media!
Categories:
You might also like...

Air Fryer Apple Fries
Crispy, cinnamon-sugar coated apple fries made in the air fryer — a quick, family-friendly snack or dessert ready in under 30 minutes.

Air Fryer Bacon Cheese Croissants
Golden, flaky croissants filled with ham, melted cheddar and Swiss, finished with a glossy egg wash and cooked in the air fryer for quick, crowd pleasing results.

Air Fryer Bang Bang Cauliflower
Crispy air fryer cauliflower tossed in a creamy sweet-spicy bang bang sauce for a crowd-pleasing, quick appetizer or weeknight treat.
Did You Make This?
Leave a comment & rating below or tag @festive-cooks on social media!
Rate This Recipe
Share This Recipe
Enjoyed this recipe? Share it with friends and family, and don't forget to leave a review!
Comments (1)
This recipe looks amazing! Can't wait to try it.
Comments are stored locally in your browser. Server comments are displayed alongside your local comments.

Hi, I'm Jessica!
What's Popular

30-Minute Meals!
Join to receive our email series which contains a round-up of some of our quick and easy family favorite recipes.