
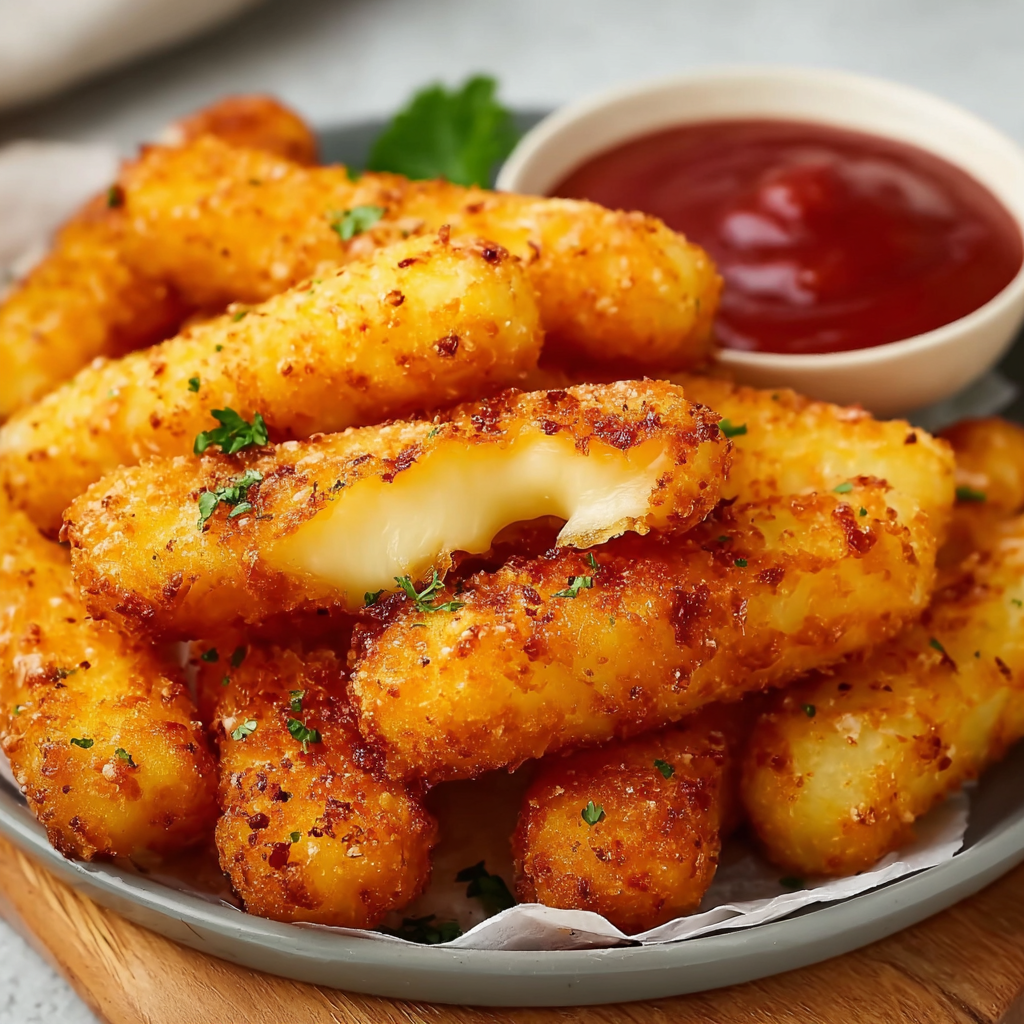
Cheese Potato Fingers

Crispy, cheesy potato fingers with a creamy potato base, bacon, and cheddar — a perfect appetizer or snack for parties and weeknight cravings.

This recipe for Cheese Potato Fingers has been my go-to party starter and weeknight treat for years. I first assembled the idea on a noisy Sunday afternoon when leftover baked potatoes met a block of sharp cheddar and a handful of pantry staples. The combination felt obvious and addictive: creamy mashed potato, crispy bacon, and long, melty cheddar sticks wrapped in a crackling golden coating. Every time I make these, the kitchen fills with the buttery, toasty scent of frying breadcrumbs and the house immediately becomes a gathering spot.
What makes these fingers special is the texture contrast — a soft, savory interior studded with scallions and bacon, and a crunchy exterior that shatters on the first bite revealing molten cheddar. I remember serving them at a winter potluck once; my eldest niece declared them "better than any fried snack" and went back for seconds and thirds. They travel well warm from the fryer or oven, and they’re easy to scale up for crowds. Below I share everything I’ve learned making them crisp, stable, and reliably cheesy.
Why You'll Love This Recipe
- Made from pantry staples and common fresh items — russet potatoes, cheddar, bacon, flour, cornstarch, and panko — making it easy to pull together on short notice.
- Ready in about 35–40 minutes start to finish when potatoes are pre-cooked; hands-on prep is about 20 minutes and frying is quick, so it's great for last-minute guests.
- Flexible technique: shallow fry for a tender interior and crisp exterior, or bake for a lower-fat version that still browns beautifully.
- Make-ahead friendly: assemble, chill, and freeze the shaped fingers for quick frying later — perfect for party prep or batch cooking.
- Crowd-pleasing and customizable: add herbs, swap bacon for smoked paprika, or use pepper jack for spice; they hold up well on a platter and pair with many dips.
In my kitchen these are a reliable winner. Once I learned to chill the shaped sticks before breading, they stopped falling apart in the oil. Guests always ask for the recipe and often report making them for game day or holiday gatherings — they travel well and reheat beautifully in a hot oven.
Ingredients
- Russet Potatoes: 3 medium russets (about 1 1/2 lb cooked and cubed). Choose evenly sized potatoes so they cook at the same rate; russets give a fluffy interior that binds well when mashed.
- Cheddar Cheese: 8 oz block sharp cheddar cut into 3–4-inch strips. A good-quality sharp cheddar (Cabot, Tillamook) melts well while retaining flavor; avoid pre-shredded varieties for cleaner melting.
- Bacon: 1/4 cup diced cooked bacon (about 2–3 slices). Use thick-cut if you like texture; cook until crisp then drain and chop.
- Sour Cream: 1/2 cup full-fat sour cream to add creaminess and a slight tang that balances the cheese.
- Green Onion: 1/4 cup diced (about 2–3 green onions). Adds freshness and a mild bite in each finger.
- Salt and Pepper: 1 teaspoon salt and 1/2 teaspoon freshly ground black pepper to season the potato mixture.
- Coating: 1 cup all-purpose flour for dusting, 1 large egg beaten, 2/3 cup cornstarch, and 1 1/4 cups panko breadcrumbs (about 3.5 oz). Cornstarch helps the coating cling and crisps up nicely with panko.
- Oil for Frying: 1 liter vegetable or canola oil (about 34 fl oz / roughly 4 1/4 cups). Peanut oil can be used if you prefer its higher smoke point and flavor.
Instructions
Prepare the Potatoes: Cook the potatoes until just tender (baked, boiled, or pressure-cooked). Cool slightly, then cube and mash lightly — you want a slightly chunky texture, not a completely smooth mash. Measure the mash so the mixture is cohesive but not wet; remove excess moisture with a towel if needed. Season with salt and pepper. Mix the Filling: Fold in the diced bacon, diced green onions, and sour cream into the warm mashed potatoes. Taste and adjust salt — the cheddar will add saltiness, so be conservative. The mixture should hold together enough to shape around cheese strips; if it's too loose, add 1–2 tablespoons of cornstarch to bind. Shape the Fingers: Take a golf-ball-sized scoop of potato mixture, flatten in your palm, place a cheddar strip in the center, and wrap the potato around it, forming a 3–4 inch finger. Seal seams tightly. Repeat until the filling is used. Place shaped fingers on a parchment-lined tray and chill for 20–30 minutes — chilling firms them so the coating sticks and the cheese core stays intact while frying. Set up the Coating Station: Place the flour, beaten egg, and panko mixed with cornstarch in three shallow bowls. Lightly dust each chilled finger in flour, dip in egg, and roll generously in panko. Press breadcrumbs firmly so they adhere — a double-dip (egg, panko again) gives extra crispness. Fry Until Golden: Heat oil in a heavy-bottomed pot to 350°F (175°C). Fry in small batches for 2–3 minutes per side until deep golden. Use a thermometer and don’t overcrowd the pot to maintain oil temperature. Drain on a rack or paper towels. If you prefer baking, brush with oil and bake at 425°F (220°C) for 12–15 minutes, turning halfway. Serve Immediately: Serve warm with dips such as ketchup, smoky aioli, ranch, or a spicy sriracha mayo. The cheese will be melty and the exterior crisp — warn guests that the interior can be hot.
You Must Know
- Storage: These hold in the refrigerator for up to 3 days in an airtight container; reheat in a 400°F oven for 8–10 minutes to re-crisp. Freeze unbaked fingers on a tray, then transfer to a bag for up to 3 months.
- Nutritional note: These are indulgent finger foods — expect higher fat from cheese, sour cream, and frying oil; bake for a lighter option.
- Binding tip: If the filling is too wet, a tablespoon of cornstarch helps without changing flavor; avoid adding too much flour which will make the interior gummy.
- Safety: Fry in small batches at consistent oil temperature to prevent oil absorption and ensure even browning; cool slightly before serving as cheese retains heat.
I love that these are forgiving — once I started chilling and double-coating, they stopped falling apart and the cheese stayed encased. They’ve become my party shortcut: assemble the night before, freeze, and fry just before guests arrive for fresh, hot fingers every time.
Storage Tips
To maintain crispness, cool fried fingers on a wire rack rather than paper towels so steam doesn’t soften the crust. Store in a single layer in an airtight container lined with paper towels for up to 3 days. For longer storage, freeze uncooked, breaded fingers on a tray until firm, then move to a resealable freezer bag for up to 3 months. Reheat directly from frozen by frying (add an extra minute or two) or place on a baking sheet in a preheated 400°F oven for 12–15 minutes, flipping once. Avoid microwaving for reheating as it will make the coating soggy and the cheese could overheat.
Ingredient Substitutions
If you need to adapt, you can swap bacon for chopped smoked ham or crispy pancetta for a different smoke profile. For a vegetarian version, omit bacon and add roasted red pepper or sun-dried tomatoes. Replace sharp cheddar with mozzarella for a milder, ultra-stretchy interior (it will be less flavorful but wonderfully gooey). For gluten-free, use a certified gluten-free panko and a gluten-free flour blend. To reduce oiliness, try baking at 425°F with a light brushing of oil; flip once to ensure both sides brown evenly.
Serving Suggestions
Serve as an appetizer with an assortment of dips: smoky chipotle mayo, classic ketchup, herbed sour cream, or a tangy mustard dip. Garnish with finely chopped chives or parsley for color. These are ideal for game days, holiday buffets, and casual dinner sides alongside a crisp salad and roasted vegetables. Pair with a cold beer, a crisp sparkling wine, or a bright, herb-forward cocktail to cut through the richness.
Cultural Background
These fingers are a hybrid of comfort-food traditions — the British love of potato sides, the American obsession with fried, cheesy snacks, and the influence of Japanese panko breadcrumbs for extra crunch. Variants of cheese-stuffed potato bites appear in many cuisines, from South American croquettes to Eastern European potato-cheese piroshki; this version leans American with bacon and cheddar but borrows technique from international frying and coating methods.
Seasonal Adaptations
In winter, add caramelized onions and a pinch of smoked paprika for warmth; in spring, fold in fresh herbs like dill and parsley for brightness. For summer gatherings, pair with a fresh corn salsa or grilled vegetable relish. During holiday seasons, swap in sage and swap bacon for pancetta for a richer, spiced profile. The technique remains the same — adjust the inclusions to match seasonal produce and the occasion.
Meal Prep Tips
Shape all fingers, place them on a tray, and freeze until firm. Once frozen, transfer to a heavy-duty freezer bag. Fry straight from frozen, adding about 30–60 seconds to the frying time. For make-ahead convenience, you can also fully fry them, cool, and freeze; reheat in a hot oven to restore crunch. When prepping for a party, aim to bread in the morning and freeze; fry just before guests arrive for the freshest texture.
Final note: This snack is all about contrasts — creamy inside, cracker-crisp outside, and a satisfying hit of cheddar and bacon. Tinker with spices and dipping sauces to make it your own, and don’t underestimate the power of chilling and a solid double-coat for perfect results. Enjoy sharing these with friends and family — they always disappear fast.
Pro Tips
Chill shaped fingers for at least 20 minutes before breading to prevent them from falling apart while frying.
Use a thermometer to maintain oil at 350°F (175°C); consistent temperature prevents soggy, oily coating.
Double-coating (egg then panko, then egg and panko again) creates a sturdier crust that holds the cheese inside.
If the potato mix feels too wet, add 1 tablespoon of cornstarch at a time until it holds shape without becoming pasty.
This nourishing cheese potato fingers recipe is sure to be a staple in your kitchen. Enjoy every moist, high protein slice — it is perfect for breakfast or as a wholesome snack any time.
Tags
Cheese Potato Fingers
This Cheese Potato Fingers recipe makes perfectly juicy, tender, and flavorful steak every time! Serve with potatoes and a side salad for an unforgettable dinner in under 30 minutes.
Ingredients
Main
Coating
Frying
Instructions
Cook and mash potatoes
Cook russet potatoes until fork-tender (bake, boil, or pressure-cook). Cool slightly, then cube and mash until slightly chunky. Remove excess moisture if needed and season with salt and pepper.
Combine filling
Fold diced bacon, diced green onions, and sour cream into the warm mashed potatoes. Adjust seasoning and add 1–2 tablespoons cornstarch if the mixture is too loose to shape.
Shape potatoes around cheese
Flatten a portion of the potato mixture in your palm, place a cheddar strip in the center, and wrap to form a 3–4 inch finger. Seal seams and chill shaped fingers for 20–30 minutes.
Set up coating station
Place flour, beaten egg, and panko mixed with cornstarch in separate shallow bowls. Dredge chilled fingers in flour, dip in egg, and roll in panko. For extra crunch, double-dip (egg and panko again).
Fry until golden
Heat oil to 350°F (175°C) and fry fingers in small batches for 2–3 minutes per side until deep golden. Drain on a wire rack. Alternatively, bake at 425°F for 12–15 minutes, turning once.
Serve hot
Serve immediately with dipping sauces. Warn guests that the interior will be hot and melty.
Last Step: Please leave a rating and comment letting us know how you liked this recipe! This helps our business to thrive and continue providing free, high-quality recipes for you.
Nutrition
Did You Make This?
Leave a comment & rating below or tag
@festive-cooks on social media!
Categories:
You might also like...

Air Fryer Bang Bang Cauliflower
Crispy air fryer cauliflower tossed in a creamy sweet-spicy bang bang sauce for a crowd-pleasing, quick appetizer or weeknight treat.

Air Fryer Buffalo Cauliflower
Crispy battered cauliflower florets tossed in a tangy buffalo sauce, ready in the air fryer for a spicy, crowd pleasing snack or light meal.

Air Fryer Honey Butter Garlic Chicken
Crispy, juicy chicken tossed in a glossy honey-butter-garlic glaze — ready in minutes with an air fryer for an easy weeknight favorite.
Did You Make This?
Leave a comment & rating below or tag @festive-cooks on social media!
Rate This Recipe
Share This Recipe
Enjoyed this recipe? Share it with friends and family, and don't forget to leave a review!
Comments (1)
This recipe looks amazing! Can't wait to try it.
Comments are stored locally in your browser. Server comments are displayed alongside your local comments.

Hi, I'm Jessica!
What's Popular

30-Minute Meals!
Join to receive our email series which contains a round-up of some of our quick and easy family favorite recipes.