
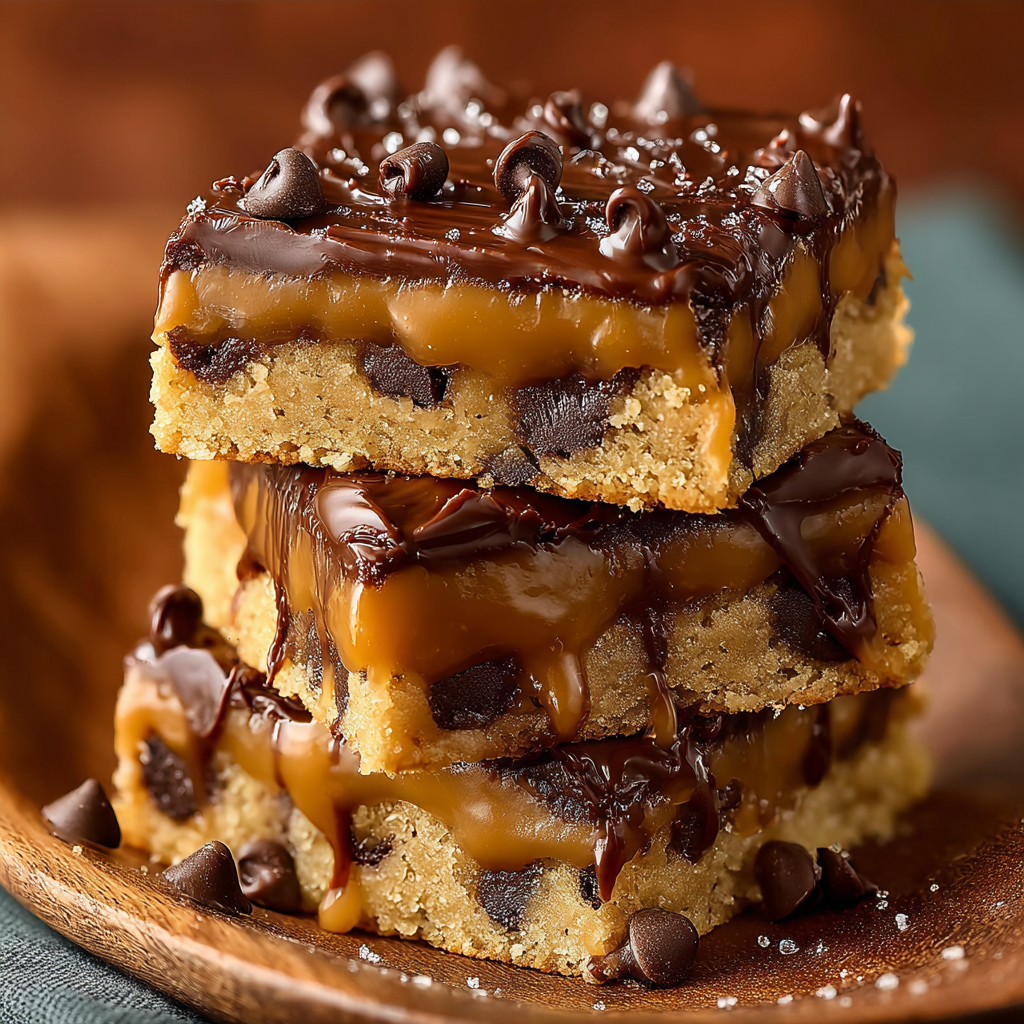
Caramel Cookie Bars

Buttery, chewy bars layered with sticky caramel — an irresistible treat that travels well and disappears fast.

This caramel cookie bars recipe has been my kitchen cheat for celebrations, potlucks, and those afternoons when I crave something sweet and buttery. I discovered this combination years ago while trying to make a transportable dessert that felt like a cookie and a candy at once. The result is a thick, tender base with golden edges, a ribbon of lush caramel in the middle, and a slightly crisp top that makes every bite texturally fascinating. It became the thing I bring to family gatherings when I want compliments without drama.
I remember first testing these on a rainy Saturday: I melted butter in a heavy saucepan, stirred in sugar, and the kitchen filled with warm, toasty notes that hinted at the finished bar. My partner kept walking through the kitchen asking when it would be ready. When the bars came out warm, the top glistening and the caramel still soft, everyone hovered with spoons. These are not delicate pastries — they’re confident, forgiving, and endlessly adaptable. Once you make a batch, you’ll find reasons to tweak them: sea salt on top, dark chocolate chips, or swapping the caramel for dulce de leche.
Why You'll Love This Recipe
- Ready in about 45 minutes from start to finish — quick enough for an afternoon baking session yet impressive for guests.
- Uses pantry staples like butter, sugar, flour, and eggs, with store-bought caramel as a shortcut option when life is busy.
- Make-ahead friendly: store in an airtight container for up to 4 days or freeze for up to 3 months.
- Crowd-pleasing texture: a slightly crisp edge, chewy interior, and a gooey caramel ribbon that feels indulgent without being fussy.
- Versatile for dietary swaps — easy to adapt with nut butters, gluten-free flour blends, or vegan caramel alternatives.
At our house, these bars became the unofficial dessert of weekend get-togethers. I love how forgiving the dough is: it can be pressed with your hands or smoothed with the back of a spoon, and the caramel hides a multitude of imperfections. Kids and adults alike always ask for the corner pieces first.
Ingredients
- Butter: 1 cup (8 tablespoons) unsalted butter, melted. Butter is essential for richness and structure — opt for a high-quality European-style butter if you can for a deeper flavor. If using salted butter, reduce added salt.
- Sugar: 1 cup granulated sugar plus 1/2 cup packed brown sugar. The granulated sugar provides sweetness and lift while the brown sugar contributes moisture and a subtle caramel note. I like Domino or C&H for consistent results.
- Eggs: 2 large eggs, room temperature. Eggs bind and add tenderness; bringing them to room temperature helps the batter emulsify smoothly.
- Vanilla: 2 teaspoons pure vanilla extract. Real vanilla makes a marked difference — Nielsen-Massey is my go-to when I want dependable flavor.
- Flour: 2 1/4 cups all-purpose flour. Spoon into the measuring cup and level off for accurate measurement to avoid a dry, dense bar.
- Baking soda: 1/2 teaspoon to give a touch of lift and a soft crumb.
- Caramel: 1 cup soft caramel candies, melted with 1 tablespoon heavy cream, or 1 cup jarred caramel sauce. Use a good quality caramel — it’s the star of the middle layer.
- Finishing (optional): Flaky sea salt for sprinkling or 1/2 cup chopped pecans for texture. These small additions elevate the flavor balance.
Instructions
Step 1 — Preheat and prepare: Preheat the oven to 350°F (175°C). Line a 9x13-inch baking pan with parchment paper that overhangs two sides for easy removal, and lightly grease the parchment. Proper pan preparation ensures clean slices and prevents sticking. Step 2 — Melt and mix butter with sugar: Melt 1 cup (8 tablespoons) butter in a small saucepan over medium heat or in the microwave in 30-second bursts. Transfer to a large mixing bowl and whisk in 1 cup granulated sugar and 1/2 cup packed brown sugar until glossy. This warm-method gives a slightly denser, more cookie-like bar than creamed butter at room temperature. Step 3 — Add eggs and vanilla: Beat in the eggs one at a time, fully incorporating each before adding the next, then stir in 2 teaspoons vanilla extract. Mixing eggs in gradually ensures a stable emulsion and prevents overbeating, which can lead to a tough crumb. Step 4 — Sift in dry ingredients: Sift together 2 1/4 cups all-purpose flour and 1/2 teaspoon baking soda; fold into the wet ingredients until just combined. Avoid overmixing — the dough should hold together but be slightly sticky. If it feels too dry, add a teaspoon of milk. Step 5 — Press half the dough and add caramel: Press half of the dough evenly into the prepared pan using lightly greased fingers or the back of a measuring cup. Drizzle or pour the melted caramel evenly over this layer, leaving a 1/4-inch border to prevent overflow. Step 6 — Top and bake: Break the remaining dough into large pieces and gently press over the caramel layer, leaving small gaps where caramel peeks through for a rustic look. Bake at 350°F (175°C) for 20–25 minutes, until the top is golden and a toothpick inserted near the center comes out with a few moist crumbs. Allow to cool completely in the pan on a wire rack before lifting out and slicing.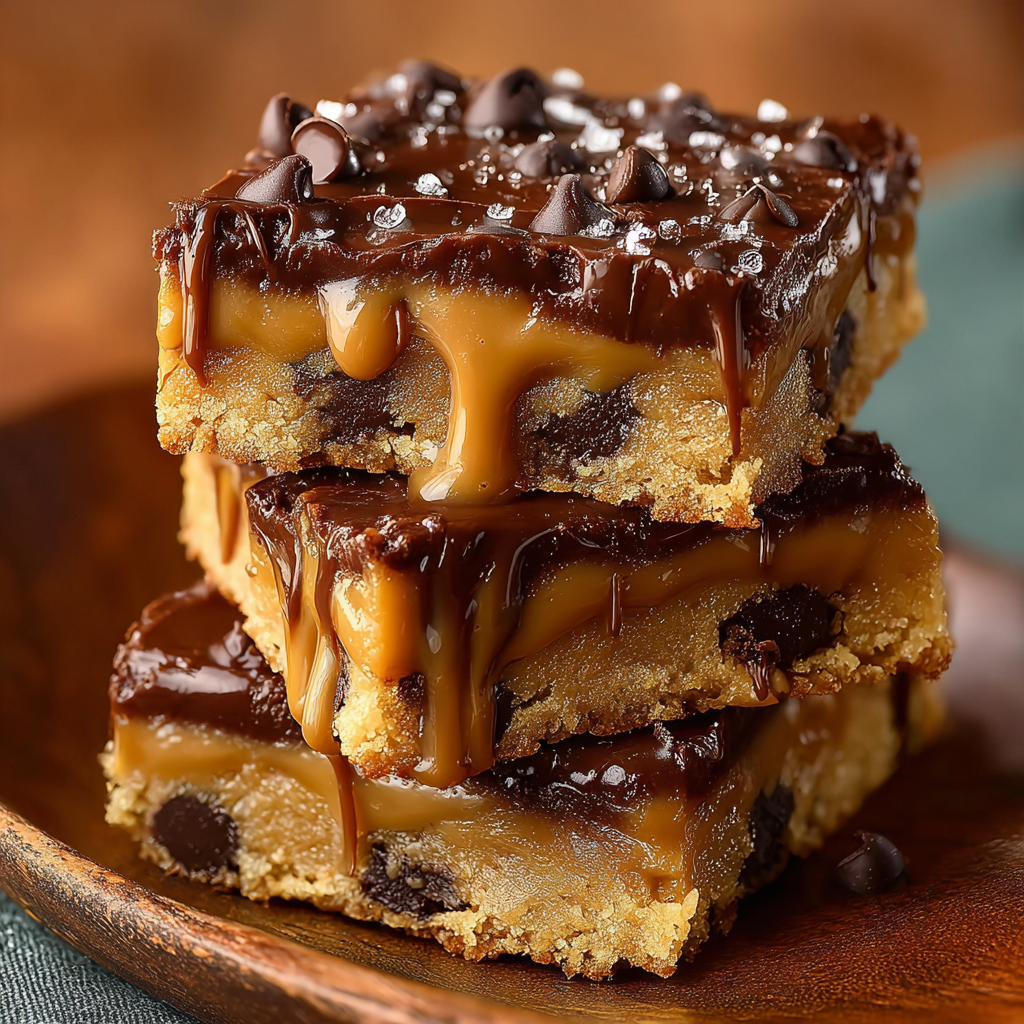
You Must Know
- These bars keep at room temperature for 1–2 days in an airtight container, or refrigerated for up to 4 days; freeze wrapped individually for up to 3 months.
- They are higher in sugar and butter — a little goes a long way, so cut into smaller portions for entertaining.
- Using pre-made caramel is an acceptable shortcut, but homemade caramel warm enough to spread creates a silkier center.
- Bars are not gluten-free or vegan unless you use specialized swaps; they are a good source of comfort carbs but not low-carb friendly.
My favorite part is how the caramel settles and tucks into pockets as the bars cool — the first bite gives you that oozy hit followed by a tender, cookie-like crumb. Family members often debate whether the center should be softer or chewier; I like it soft but not runny so it slices neatly.
Storage Tips
Store cooled bars in an airtight container at room temperature for up to 48 hours. To keep the caramel from becoming overly firm, place a sheet of parchment between layers. For longer storage, refrigerate for up to 4 days; bring to room temperature before serving to soften the caramel. For freezing, wrap each bar tightly in plastic wrap and place in a zip-top freezer bag for up to 3 months. Reheat gently in a 325°F oven for 8–10 minutes or microwave on low power for 10–15 seconds to restore chewiness.
Ingredient Substitutions
If you need dairy-free options, replace butter with a vegan stick-style butter (measure 1:1) and use a vegan caramel made from coconut cream and brown sugar. To make gluten-free, swap in a 1-to-1 gluten-free flour blend with xanthan gum — texture will be slightly more fragile. For a richer flavor, replace 1/4 cup of flour with 1/4 cup almond flour. If you prefer less sweetness, reduce granulated sugar to 3/4 cup and the brown sugar to 1/3 cup; expect a slightly drier texture.
Serving Suggestions
Serve warm or at room temperature. For a café-style presentation, warm a bar slightly and serve with a scoop of vanilla ice cream and a sprinkle of flaky sea salt. Pair with robust coffee or a glass of cold milk. For parties, cut into small squares and arrange on a platter with fresh fruit to balance sweetness. Chopped toasted pecans or a drizzle of melted dark chocolate makes for a sophisticated finish.
Cultural Background
Bars like these sit at the crossroads of cookie and candy in American baking traditions. Layered bar desserts — often featuring a shortbread or cookie base with a sweet middle — are staples in American potlucks and bake sales. The use of caramel as a middle layer echoes classic confections such as Millionaire's Shortbread, while the rustic top is reminiscent of home-style cookie bars that evolved from reuse of cookie dough and pantry staples. These treats celebrate American comfort baking: rich, shareable, and celebratory.
Seasonal Adaptations
In autumn, fold 1 teaspoon ground cinnamon and 1/4 teaspoon nutmeg into the dough and swap pecans for walnuts for a warming fall profile. For winter holidays, sprinkle finely chopped crystallized ginger on top before baking and add a tablespoon of molasses to the wet ingredients for depth. In summer, top cooled bars with a layer of whipped cream and sliced berries for a lighter finish. Adjust caramel to salted caramel in chillier months to balance richer flavors.
Meal Prep Tips
Prepare the dough and refrigerate for up to 24 hours before baking — chilled dough firms and is easier to press into the pan. Alternatively, fully bake, cool, and slice into bars; freeze individual bars for grab-and-go snacks. Label containers with dates and reheat briefly before serving. For bulk prep, double the recipe and bake in two pans; rotate pans halfway through baking if your oven heats unevenly.
These bars are forgiving, transport-friendly, and a guaranteed conversation starter. Make a batch, let them cool enough to cut cleanly, and watch them disappear — they’re that dependable in both flavor and family appeal.
Pro Tips
Bring eggs to room temperature to help the batter emulsify and ensure even texture.
Press the bottom layer evenly using the back of a measuring cup to avoid thin spots where caramel might leak.
Allow the bars to cool completely before slicing for cleaner edges; refrigerate briefly if you want very tidy squares.
This nourishing caramel cookie bars recipe is sure to be a staple in your kitchen. Enjoy every moist, high protein slice — it is perfect for breakfast or as a wholesome snack any time.
FAQs about Recipes
Can I use pre-made caramel?
Yes — you can use store-bought caramel sauce or melt soft caramel candies with a splash of heavy cream until smooth. Both work; candies give a chewier set.
How long do these bars freeze?
Wrap individual bars tightly and freeze for up to 3 months. Thaw in the refrigerator overnight and bring to room temperature before serving.
What if the top browns before the middle is done?
If top is browning too quickly, tent loosely with foil for the final 5–10 minutes until the center is set.
Tags
Caramel Cookie Bars
This Caramel Cookie Bars recipe makes perfectly juicy, tender, and flavorful steak every time! Serve with potatoes and a side salad for an unforgettable dinner in under 30 minutes.
Ingredients
Base
Filling
Optional finishing
Instructions
Preheat the oven and prep your baking pan
Preheat oven to 350°F (175°C). Line a 9x13-inch pan with parchment and grease lightly so the bars release cleanly after cooling.
Melt butter, then mix with sugar
Melt 1 cup butter and whisk in 1 cup granulated sugar and 1/2 cup brown sugar until glossy to create the wet base.
Add eggs one by one, and stir in vanilla
Add eggs one at a time, mixing thoroughly after each addition, then stir in 2 teaspoons vanilla until the mixture is smooth and combined.
Sift in flour and baking soda, mix until combined
Sift together 2 1/4 cups flour and 1/2 teaspoon baking soda, then fold into the wet ingredients until just combined to avoid overdeveloping gluten.
Press half the mixture into the pan, drizzle with caramel
Press half the dough evenly into the prepared pan, then spoon or drizzle 1 cup melted caramel over the base, leaving a small border.
Cover with remaining dough and bake until golden
Gently cover the caramel with remaining dough pieces, bake at 350°F (175°C) for 20–25 minutes until golden and set, then cool completely before slicing.
Last Step: Please leave a rating and comment letting us know how you liked this recipe! This helps our business to thrive and continue providing free, high-quality recipes for you.
Nutrition
Did You Make This?
Leave a comment & rating below or tag
@festive-cooks on social media!
Categories:
You might also like...

Air Fryer Bang Bang Cauliflower
Crispy air fryer cauliflower tossed in a creamy sweet-spicy bang bang sauce for a crowd-pleasing, quick appetizer or weeknight treat.

Air Fryer Buffalo Cauliflower
Crispy battered cauliflower florets tossed in a tangy buffalo sauce, ready in the air fryer for a spicy, crowd pleasing snack or light meal.

Air Fryer Honey Butter Garlic Chicken
Crispy, juicy chicken tossed in a glossy honey-butter-garlic glaze — ready in minutes with an air fryer for an easy weeknight favorite.
Did You Make This?
Leave a comment & rating below or tag @festive-cooks on social media!
Rate This Recipe
Share This Recipe
Enjoyed this recipe? Share it with friends and family, and don't forget to leave a review!
Comments (1)
This recipe looks amazing! Can't wait to try it.
Comments are stored locally in your browser. Server comments are displayed alongside your local comments.

Hi, I'm Jessica!
What's Popular

30-Minute Meals!
Join to receive our email series which contains a round-up of some of our quick and easy family favorite recipes.