
Candy Cane Cookies

Buttery, peppermint-kissed sugar cookies swirled with candy-cane crunch — a festive, easy-to-make holiday favorite that's perfect for gifting and cookie swaps.

This recipe for Candy Cane Cookies has been a seasonal favorite in my kitchen for years. I first developed the idea one December while trying to marry a classic buttery cookie with the sharp, cool brightness of peppermint candy canes we’d received in our holiday stockings. The first batch came out with delicate edges, a soft center, and the unmistakable crackle of crushed candy cane on top. That contrast of tender cookie and crunchy peppermint became the hallmark of every plate I brought to holiday parties thereafter. I usually make these when the house is full of guests, and I love how the aroma of vanilla and peppermint fills the air while everyone tidies up the tree.
What makes these especially memorable is how accessible the ingredients are and how reliably they behave in the oven. The dough is forgiving: it handles slight overmixing, it responds well to chilling, and it bakes into uniformly golden cookies with a satisfying snap. Over the years I’ve refined the technique so even first-time bakers can produce consistent results — from simple scoop-and-bake rounds to elegant swirled cookies. They travel well in tins, freeze beautifully, and the peppermint crunch holds up, making them an ideal choice for gift-giving or a cozy afternoon of baking with kids.
Why You'll Love This Recipe
- Simple pantry ingredients plus a small stash of candy canes turn into a festive treat in under an hour from start to finish, ideal for last-minute baking.
- Ready in about 30 minutes of active time with an extra 30 minutes optional chilling for cleaner shapes — a great balance of speed and control.
- Flexible shaping: roll into balls for rustic cookies or chill and slice for neat, uniform rounds that are perfect for presentation.
- Uses familiar measurements and techniques (creaming butter and sugar) so beginners can succeed while experienced bakers can tweak textures with chilling time.
- Make-ahead friendly: dough freezes well and baked cookies keep in an airtight container for up to a week, or can be gifted in tins.
- Customizable garnish options — crushed candy canes, coarse sugar, or a light drizzle of white chocolate for a fancier finish.
I’ve gifted these to neighbors and brought them to every cookie swap for the past decade. My family’s reaction is always the same: they disappear within hours. One year my niece declared them “the sparkliest cookies” because of the candy cane crystals on top — a nickname that stuck and always makes us smile when we bake this batch.
Ingredients
- All-purpose flour (2 1/2 cups): Use a reliable brand like King Arthur or Gold Medal for consistent results. Spoon flour into the measuring cup and level with a knife to avoid a dense dough.
- Baking powder (1/2 teaspoon): Fresh baking powder gives lift and a fine crumb; if it's older than six months, consider replacing it.
- Salt (1/4 teaspoon): A pinch of kosher or sea salt balances sweetness — don’t skip it.
- Unsalted butter (3/4 cup, softened): Use real butter for flavor; allow it to soften at room temperature until yielding to gentle pressure but not melted.
- Granulated sugar (3/4 cup): Provides structure and crisp edges; for a softer center you can swap half for light brown sugar.
- One large egg: Brings richness and helps bind the dough; room temperature eggs incorporate more smoothly.
- Vanilla extract (1 teaspoon): Pure vanilla adds depth — Nielsen-Massey or store-brand pure vanilla both work well.
- Peppermint extract (1/2 teaspoon): Use sparingly; peppermint is potent and a little goes a long way toward that signature candy-cane flavor.
- Red gel food coloring: Gel gives vivid color without altering dough hydration; use a toothpick’s worth if you want a pale pink swirl, or a tiny dot for bright red.
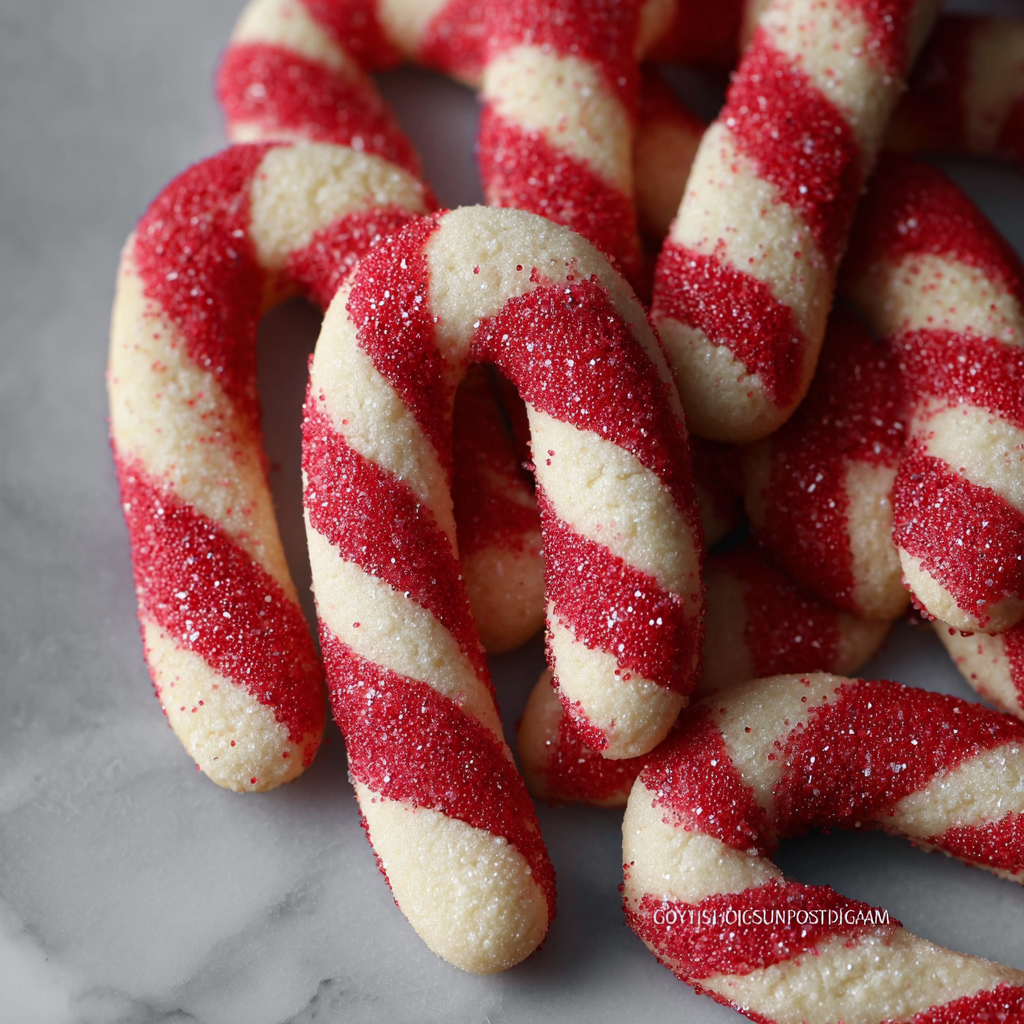
- Crushed candy canes or coarse sugar for topping (optional): About 1/2 cup crushed candy canes adds festive crunch; pulse in a food processor or seal in a bag and crush with a rolling pin.
Instructions
Step 1 — Prep and preheat: Preheat the oven to 350°F (175°C). Line two baking sheets with parchment paper or silicone mats. Remove butter and egg from the fridge 20 minutes before starting so they reach room temperature; this ensures the butter creams properly and the egg blends without stranding the fat. Step 2 — Whisk dry ingredients: In a medium bowl, whisk together 2 1/2 cups all-purpose flour, 1/2 teaspoon baking powder, and 1/4 teaspoon salt until evenly combined. Sifting isn’t necessary but can lighten the mixture if your flour is compacted. Step 3 — Cream butter and sugar: In a large bowl, use an electric mixer on medium speed to beat 3/4 cup softened unsalted butter with 3/4 cup granulated sugar for 2–3 minutes, until pale and fluffy. Properly creamed butter traps air that helps the cookies rise; scrape the bowl once to ensure even texture. Step 4 — Add egg and extracts: Beat in 1 large room-temperature egg, 1 teaspoon vanilla extract, and 1/2 teaspoon peppermint extract until just combined. Avoid overmixing after the egg is added to keep the cookies tender. Step 5 — Combine and color: Mix the dry ingredients into the wet in two additions, folding on low speed until a cohesive dough forms. If you want a classic red-and-white swirl, divide the dough in half: keep one portion plain and tint the other with a small amount of red gel food coloring until you reach your desired hue. Step 6 — Chill or shape: For cleaner shapes, chill the dough for 30 minutes wrapped in plastic. Alternatively, scoop 1-tablespoon portions onto prepared sheets, leaving 2 inches between cookies. Chilled dough will spread less and hold a neater edge. Step 7 — Bake: Bake at 350°F (175°C) for 10–12 minutes, rotating the pans halfway through. Cookies should be lightly golden at the edges and slightly pale in the center — they continue to set as they cool. Remove to a wire rack after 2 minutes on the sheet. Step 8 — Finish: While still warm, sprinkle tops with 1/2 cup crushed candy canes so they stick. For a glossy finish, wait for cookies to cool and then drizzle melted white chocolate and press crushed candy cane on top.
You Must Know
- These cookies keep well at room temperature in an airtight container for up to 5 days, or freeze baked cookies for up to 3 months; thaw at room temperature before serving.
- Chilling the dough for 30 minutes reduces spread and sharpens edges; if you prefer softer, more spread cookies, skip chilling and watch the oven carefully.
- Peppermint extract is concentrated — start with 1/2 teaspoon and taste the dough (small raw-egg risk) or trust the measurement; adding more can easily overpower the vanilla and butter notes.
- Crushed candy canes add moisture-scattering sugar shards that keep a crunchy contrast; for a milder texture, substitute coarse sanding sugar.
My favorite part of baking these is watching the crushed candy cane melt slightly into the warm cookie tops and then recrystallize into shimmering sugar. One year our tree-trimming party became a spontaneous cookie decorating contest; everyone loved experimenting with the amount of peppermint and different drip patterns of white chocolate. Those evenings are what make this recipe feel like more than just a dessert — it’s become a ritual that signals the holidays have truly begun.
Storage Tips
Store fully cooled cookies in an airtight container layered between sheets of parchment paper at room temperature for up to five days. For longer storage, freeze baked cookies in a single layer on a sheet pan until solid, then transfer to a freezer-safe container or bag for up to three months; separate layers with parchment. To refresh texture after freezing, place cookies on a baking sheet in a 300°F (150°C) oven for 3–5 minutes — this re-crisps the edges without overbrowning. Dough freezes well too: roll into logs, wrap tightly, and freeze for up to two months; thaw overnight in the refrigerator before slicing and baking.
Ingredient Substitutions
If you need a dairy-free option, substitute vegan butter sticks measured cup-for-cup and add a teaspoon of neutral oil if the dough seems dry. For a softer, chewier cookie, replace 1/4 cup of granulated sugar with light brown sugar. To make mini cookies, use a 1/2-teaspoon scoop and reduce baking time to 7–9 minutes. Gluten-free adaptations work best with a trusted 1-to-1 gluten-free flour blend that contains xanthan gum; expect a slightly crumblier texture. If peppermint extract is unavailable, finely grate fresh zest from a small candy cane substitute or use 1/4 teaspoon peppermint oil diluted with a little vanilla.
Serving Suggestions
Present these on a festive platter with sprigs of fresh rosemary or mint for a holiday contrast. They pair beautifully with hot chocolate, mulled cider, or a simple cup of black tea. For a dessert plate, serve alongside a scoop of vanilla ice cream with crushed candy cane sprinkled on top. For gifting, stack six to eight cookies between parchment rounds in a cello bag tied with ribbon. They also make great companion cookies for an assorted holiday box — their peppermint bite cuts through richer treats like fudgy brownies.
Cultural Background
Mint- and peppermint-flavored confections became popular in Western holiday traditions during the 19th century with the rise of commercially produced candy canes. The idea of integrating peppermint into baked goods is a natural extension of that history: the bright, cooling flavor cuts through sweeter, buttery bases, offering a festive palette cleanser. While not tied to a single regional technique, these cookies draw from classic American sugar-cookie methods — creaming butter and sugar, adding an egg for structure, and using vanilla as a flavor anchor — while celebrating the seasonal peppermint tradition.
Seasonal Adaptations
In winter, use crushed candy canes and a dusting of powdered sugar for a snowy look; during the holidays, add a drizzle of white chocolate and sprinkle with red sanding sugar. For warmer months or a different palette, swap peppermint for orange extract and crushed candied orange peel. If making these for Valentine’s Day, use pink gel coloring and heart-shaped cutters on chilled dough. You can also incorporate spices like a pinch of ground ginger or cardamom for a spiced variation that pairs well with evergreen-themed gatherings.
Meal Prep Tips
For efficient cookie production, make double the dough and freeze half as a log for future baking. Portion dough with a cookie scoop onto a parchment-lined tray, flash-freeze, then transfer balls to a freezer bag; bake from frozen, adding 1–2 minutes to the bake time. Label containers with baking times and dates. If preparing cookies for an event, bake one day ahead and finish decorations the morning of to preserve crispness and visual appeal.
These Candy Cane Cookies are a reliable, cheerful addition to any holiday spread. Whether you’re baking with kids, gifting neighbors, or adding one more tin to the cookie swap, they deliver the classic comfort of buttery cookie dough with the unmistakable sparkle of peppermint. Make a batch, play with decorations, and let the festive memories begin.
Pro Tips
For accurate flour measurement, spoon flour into the cup and level with a knife rather than scooping directly from the bag.
Chill the dough for 30 minutes for cleaner edges and less spread; skip chilling for softer cookies.
Use gel food coloring to avoid changing dough hydration; add color sparingly until you reach the desired shade.
When crushing candy canes, pulse in short bursts in a food processor to avoid turning them into powder.
This nourishing candy cane cookies recipe is sure to be a staple in your kitchen. Enjoy every moist, high protein slice — it is perfect for breakfast or as a wholesome snack any time.
FAQs about Recipes
Can I freeze the dough or baked cookies?
Yes. Dough logs wrapped tightly in plastic can be frozen up to two months. Thaw overnight in the refrigerator before slicing and baking. Baked cookies freeze well for up to three months.
How can I make the peppermint flavor milder?
If you prefer a less intense peppermint note, reduce the peppermint extract to 1/4 teaspoon. Always taste cautiously if adjusting extracts, as they are concentrated.
Tags
Candy Cane Cookies
This Candy Cane Cookies recipe makes perfectly juicy, tender, and flavorful steak every time! Serve with potatoes and a side salad for an unforgettable dinner in under 30 minutes.
Ingredients
Dry ingredients
Wet ingredients
Add-ins & toppings
Instructions
Prep and preheat
Preheat oven to 350°F (175°C). Line baking sheets with parchment paper. Bring butter and egg to room temperature for even mixing.
Whisk dry ingredients
In a medium bowl, whisk together flour, baking powder, and salt until evenly combined.
Cream butter and sugar
Beat softened butter and sugar until pale and fluffy, about 2–3 minutes, to incorporate air for lift.
Add egg and extracts
Mix in the egg, vanilla, and peppermint extract until combined, taking care not to overmix.
Combine and color
Fold dry ingredients into wet in two additions. Divide dough and tint half with red gel coloring if making swirls.
Chill or shape
Chill dough 30 minutes for cleaner shapes, or scoop directly onto sheets for a softer spread. Leave 2 inches between cookies.
Bake and finish
Bake at 350°F (175°C) for 10–12 minutes until edges are lightly golden. While warm, sprinkle with crushed candy cane; cool on a wire rack.
Last Step: Please leave a rating and comment letting us know how you liked this recipe! This helps our business to thrive and continue providing free, high-quality recipes for you.
Nutrition
Did You Make This?
Leave a comment & rating below or tag
@festive-cooks on social media!
Categories:
You might also like...

Air Fryer Bang Bang Cauliflower
Crispy air fryer cauliflower tossed in a creamy sweet-spicy bang bang sauce for a crowd-pleasing, quick appetizer or weeknight treat.

Air Fryer Buffalo Cauliflower
Crispy battered cauliflower florets tossed in a tangy buffalo sauce, ready in the air fryer for a spicy, crowd pleasing snack or light meal.

Air Fryer Honey Butter Garlic Chicken
Crispy, juicy chicken tossed in a glossy honey-butter-garlic glaze — ready in minutes with an air fryer for an easy weeknight favorite.
Did You Make This?
Leave a comment & rating below or tag @festive-cooks on social media!
Rate This Recipe
Share This Recipe
Enjoyed this recipe? Share it with friends and family, and don't forget to leave a review!
Comments (1)
This recipe looks amazing! Can't wait to try it.
Comments are stored locally in your browser. Server comments are displayed alongside your local comments.

Hi, I'm Jessica!
What's Popular

30-Minute Meals!
Join to receive our email series which contains a round-up of some of our quick and easy family favorite recipes.